August 21, 2014

STYLE PICKS: SEX AND THE CITY


Carrie oh Carrie. I guess at some point in our lifes every girl has to get infected with the virus called 'Sex and the City'... I came across season 1 the other day at a local book store but didn't want to spent over 20 dollars on something that I wasn't sure I was gonna like - so I left it behind. Good call - just a week later I found the DVD at my library - for free. Yeay!

Now halfway through it, I caught the bug. Strangely though, I actually prefer the french dup version even though I understand less. To me, the original Carrie-Voice sounds way too young. So double score for me - entertainment + learning!

Well, starting the show I was expecting some crazy 90s fashion that today would seem totally unwearable. Well, fail! Although Carrie's era ended about a decade ago, she still has some serious fashion advise going. I picked the trends I especially marveled over while watching and went scrolling through the fashion lookbooks of Asos and Topshop - Well no surprise, all these trends are having a comeback this fall!


Carrie for sure sports a lot of (bra-less...) outfits that feature silky fabrics and thin straps. I love the feminin and vulnerable look of this. Also, here the material and color really come into play. Perfect for a day-to-night-outfit.

So here are my picks. All three basically go with any other piece but the more they are left to themselves, the more they shine. I definitely fell for the silky fabric, probably so nice and soft on the skin! Also - rhinestones on a dress? As long as kept classy for sure a trend that could come back!


This Pic is just so classic 'The Girls' - haha. I'm not quite sure yet about this big-manly-coat trend yet but I'm like that with most trends that are just a bit off the track. Right now I think it looks very classy and grown up while still being very eclectic. 

I was actually kinda surprised how easy it was to find oversized coats that both fit the wallet and my taste. Like the peach one - OMG, want it so badly. But the other two, too ..mmh, that grunge look. Just great. I love how in the series these are thrown over any kind of fancy evening dress - say fashion!
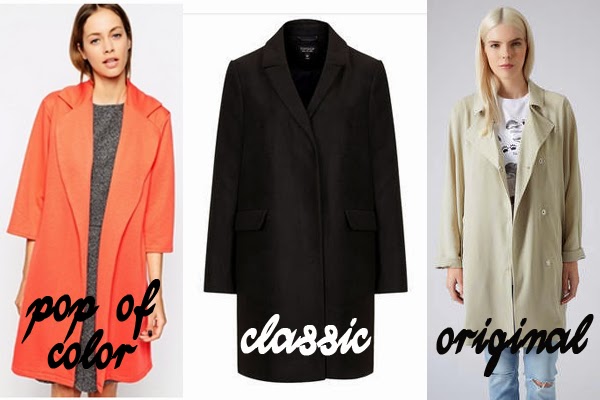

Peach // Black // Beige


Ohhh look at this gem - and I'm not talking about Mr. Big! The look on Carries face resembles quite well the way I admire her fur coat. I wonder if back in 98' PETA was already a thing? Anyway, I love the sophisticated look and overall luxurious style.

Fur has been with us for quite some seasons now. And once again, it didn't miss its place in the A/W'14 lookbooks. I guess you have to be either very brave or very cold to wear a full-on fur coat on a daily base though.

Still, a girl can dream right? So here we go: 


TeddyBear (Ok, I would actaully wear this one - so fluffy!)


Well that was my style-guide for some major 90s-fun. I loved making it and I honestly can't wait to continue watching 'Sex and the City' for more Carrie, more fashion and more NYC-lifestyle.

Hope you're having a faboulous day! Until soon!


Photocredit for all SATC-Photos: HomeBox Office 2010

August 20, 2014

WALK AROUND QUÉBEC + VINTAGE EFFECTS

Reviving this blog with a little walk around my new neighborhood. I'm so lucky to have moved to such a photogenic city as Québec City in Canada. Also having great base material I finally had the chance to play around with some fun Photoshop tutorials. I LOVE the App Afterlight, so I was actually pretty pumped to whip up some similiar effects myself. Find the tutorials I used here.

The photo above is a little cute store (look at those flowers! Are we talking gorgeous here, or not?) I found about a block off the main street. I'm actually pretty in love with the filter even though it might be a bit over the top. But nothing like some crazy light leaks..
While exploring the Parque des Champs-de-Bataille I snapped this photo. The park really reminded me of the opening scene of 'Lady and the Tramp' where everyone is happily dancing and walking the streets with a blue sky above and candy colors everywhere. Yepp - that movie has really stuck with me ever since I was a kid. Québec has these almost british looking streets everywhere and I love that. When people say Québec is the most european city in northern America they certainly have a point.
Now to the artsy part of my day. The 'Musée de Beaux Arts' is part of the park I mentioned. Aside from all the constructions work that is going on around the area right now it is really a beautiful place. Hence the first photo. This filter I think my favorite because it has that actual old-photo vibe to it whereas most other filters just enhance the colors. This could be an old puzzle that you find on fleamarkets (or your attic if you have awesome grandparents haha). 

Being the biggest rebel in town I entered the museum without giving much about the entrance. There for sure was a sign with admission prices - but I didn't see it, so I just went right to the exhibtion. I got through three stories before a security guard told me (very politely!) about the fact that I would actually need a ticket to look at all the art. A ticket for 18 Dollars. Well okay great for everybody else. Sometimes you just have to play a little stupid I guess. After all I got a free tour which is great but I would only recommend spending those 18 bucks if you're really into art. 

If you want free (yes for real this time) art walk down Réne-Levesque-Rue-Ouest. There I found this gem. Two huge dragons. Very colorful, very pretty. The effect didn't turn out exactly as I had wanted but still nice. 
Because giving every photo it's own editing is a lot of work I also taught myself how to create a Photoshop-Action with the help of this page. A real time saver and I'm especially in love with the dreamy vibe this particular photo gets from it. The action is a simple mixture of the former tutorials. Again look at the fence, look a the house - SO european! Perfect!
So yes, lovely vintage-greetings from Québec City!
Love, Tabea

July 20, 2013

HAPPY SUMMER EVERYONE!

Doll's back in the house! Hey ho kids! Maaan it's been a while, hasn't it? I was just gonna turn up real quick and tell y'all that I'm not dead! I finished up my school year and started working. Ever since the beginning of July I have been feeling a bit down though and today was the first day in ages that I really used to calm down and refresh my thoughts a bit. I'm gonna be honest: I don't have any DIYs at hand for you right now. But I feel like focusing a bit on creating some art. We'll see. Right now I'm sleeping a lot and I'm trying to see things positive as I only have to work for another 3 weeks. And you know what's then?? Ahh! I'm soo thrilled! I'm turning 18 on August 11th! Duuude! That mean I can drive by myself - finally. I'ma be a real adult! 

Haha so this is my little update for now. I'll be back soon!
Love you! Tabea ♥ 

July 05, 2013

SEW, SEW, SEW

Ouuuhhh! Karla Lagerfeld strikes again as my dad said! Guess what friends? I'm about to become a seamstress! Haha no! But I created this little skirt from a buttin-up yesterday and I'm thrilled to show it to y'all!
Okay it all started with my old swing mashine being old and pretty beaten up ... Ten years left their marks. So yesterday this 'little' paket from Amazon arrived and now: I'm the owner of a brandnew W6! No idea whether that's a very well-known brand - as I said I'm not gonna be a seamstress ever, so I not an expert at this. But so far it's doing well and I think it'll do the simple things I want it to. 
I'm not experienced at skirt-making at all, but actually with a working sewing mashine this was a quite doable project. I might write a little tutorial on this later. I added the wooden buttons, they just looked more classy than the plastic ones. I love that litle detail. The stripes are really cute and this skirt goes with so many things!


Because I've just fixed it a few days ago myself, I can show this on a DIY blog as well. I bought this necklace at 'Accesorize' (Is that how you spell it?) in Bournemouth about three years ago now. I found it the other day - well I did was fix the lock and bam! I got a new necklace! Had forgotten all about it!

Thanks for sharing my joy with the new girl in the house!
Lots of Love, Tabea ♥

July 03, 2013

DIAL #1 - STRAWBERRIES AND QUIET TIME


Welcome to DIAL (call yourself smart, if you figure out this abbreviation) #1! After blogging here for more than 2 months, I feel this little blog of mine should become a bit more 'me'. I love to share my crafts but I think it gets really fun to read a blog when you feel connected with the blogger on a more personal level...

So I decided to create this new section called DIAL where I'll share what's happening right now in my (ever so exciting) life. So if you want to know how I roll ... come along!

It's strawberry time! Yeeeay! I've been out in the garden picking strawberries almost everyday. Sugared, with whipped cream, as jam .. ouuuh, so many ways to enjoy them! My dad made the best straberry jam this year. I'm on a stawberry diet these days - it substitutes for chocolate! 

Can you guess what this pink thing is? Dried paint. Yeah ... I should start by saying I haven't really gottten around to cleaning up my craft table.. guess there was some (quite a bit) paint left in of the glasses I use to mix paints. After soaking it in warm water, I pulled it all out in one go. 

Also I sorted my fabric and put it in neat piles. What an achievement. I was actually gonna reorganize my entire craft table. I was. I didn't take a photo of the mess I created but let me tell ya: it was epic and it took me three nights to clean it up again. I couldn't find the motivation to create a completely new workspace though. I'm a bit bummed about that ... At least I decluttered my craft supplies - the hoarder in me really comes out here. 
There can't be a personal blogpost without a blogger's face in it. So here are two pictures of my face. I think Afterlight is doing quite a bit for me. I'm having an almost-no make-up phase right now. Summer's on I guess. But also I gave up mascara for about 99% of the time right now. There are multiple make-up tools I consider myself being able to use. Not mascara. At the end of the day it is everywhere except on my lashes. Every single time.
Also can you tell I got a mosquito bite right under my eye in the second picture? No? Waaaah tricked you! Haha no, but editing is really quite amazing...
Lastly a photo of my cat Schmitti. I think he's a lot like me. His face just says too well what I think these days in school - get me out of here! I don't know, somehow I'm enjoying the last few weeks / days of school. Kinda like the last days of a year. Things are winding down a bit. Time to breath. 

Not much time though: I'll start working in just about one and half weeks and maaan this year has just rushed by!

Hope you're all doing well!
Lots of Love, Tabea ♥ 

July 01, 2013

5 WAYS TO SPICE UP YOUR JOURNAL PAGES

Hey you journal-loving people! Do you ever feel like your journal is a bit plain? I write on a daily basis and I reread my entries every so often. Lately i felt bored by how all the pages looked the same with the same handwriting over and over again. 
Sooo let's do something about it! I came up with five ways to spice up your daily journal. All these options are to be pre-made, so when you sit down at night you go right to writing and just add them whenever you feel like it.

Aren't these little arrows cute? I think they're pretty cool to highlight a passage in your writing or start an entry. As you can see I used paint swatches, so I'd have a gradient ( Ombré Arrows - we're so hipster around here...), cut and glued them together.  There are tons of ways to create these cuties: big to small triangles, light to darker shades... Get creative!


Looove these! No for real, I'm already dreading using them because I want to use them over and over! Might have to make more, woooh! I think the making is rather self-explanatory. Cut cardboard, write on a piece of white paper and glue that on there. I love the color it adds to a page though! So simple, so good!
Tags, tags, tags... I've wanted to buy a pack of these at the craft store forever. Well, how about homemaking them? They're literally a 3-minute project. Cut cardboard, glue a rectangle of paper / other cardboard on there, add the circle on the top and whole-punch it! You might also add some ribbon or lines to write on.
Did you realize there was something wrong until picture three? Haha, there are some things I ALWAYS do wrong at first try. Like mirror-writing. I got everything right ... except the 'a'. Gaaaw! Whatever, this is DIY at it's finest! 
Elsie started this series 'today is (insert adjective)' and I liked it so much, I though it'd be fun to label journal entries that way. The 'Today' an 'was' are seperated in case I just need a 'Today'. Maybe if I wanna say 'Today I won a million Dollars'. It could happen!
Okay so picture-wise this isn't number 5 'cause you've seen the exclamation-mark before. Actually you've seen it in another post before but I felt this needed to be an extra point. I think everyone should have one of these exclamation-mark stamps at hand. Sometimes you just need to make a bold statement. Also a question-mark or a dot would be fun, too, wouldn't it?

I talked about how most of these papercrafts can be used without other craft supplies at hand. Therefore I used a rather simple technique:
How smart is this, please? You can store them away as long as you want and when you crave a color-pop you remove the non-sticky part of the tape and bang: there's your sticker! 
This is what I imagine those tools to be used like. I'm so thrilled to use them overthe next weeks!
Hope you enjoyed today's post just as much as I did! I'm off now to decorate my page about this beautiful sunny day!

Lots of Love, Tabea ♥

June 29, 2013

IT'S PINK - I WANT IT!


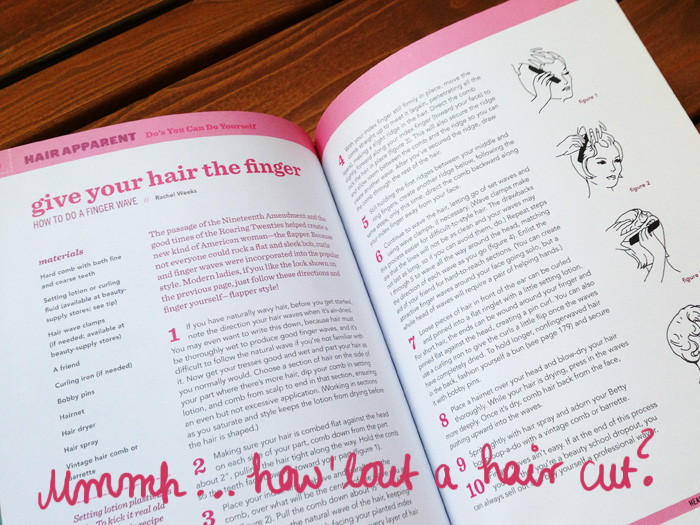
Didn't this bookcover just get you within a second? Ohhh how I love my BUST DIY Guide to Life! And because today was such a rainy, gray day (rhyming like no other...) and all I wanted to do was to cuddle up under a blanket, I grabbed this precious little thing to brighten up my afternoon a bit.

I bought the BUST Guide last January as a late Christmas gift to myself after having hovered over it literally every time I'd walk into Barnes & Nobles for weeks. I fell for the book the day I discovered the craft section at the store (reminder: I was there as an exchange student so I didn't know there was such a section at the store). I discovered there was a magazine to this book and so I bought my first BUST issue. It didn't take a day for me get through it and start longing for the book real badly...

BUST is sort of a feminist magazine but not quite so 'Hear me roar, I'm a feminist!' (nothing against that type of (maga)zine). I guess I would describe BUST as an indie magazine for creative girls - and man I've been looking for that for ages! So in the book the BUST team has collected all kinds of DIYs, recipes, tipps on style, sewing and life from former magazines issues.

Okay enough chatting, here's a peek inside!
This' the season to be sewing lalala-la-laaa! Haha, there's some great advise for sewing beginners like me in there. First they explain how a sewing mashine works, simple stitches and stuff. Later on one learns how to reshape sweaters, hem and sew skirts and pants and also how to make fascinators and jewelry! Homemade fashion here we come!

There's a hair and beauty section and I'm especially a fan of these curls, how darling are they? I'm debating on cuting my hair .. mmmh.

In this section you'll also find some snazzy tutorials on how to create the Amy Winehouse Beehive and the Twiggy eye make-up. But since beauty isn't all about hair and make-up you can find tipps on how treat scratches, insect bites and PMS etc. I find that very helpful and it also promotes the whole 'beauty comes from the inside'-thing. Like that!
Talking about the inside ... It's called a Guide to life - so there has to be food! Gooood food! As you can see the recipes look flipping delicious, but you know what? There's even a tutorial on how to make a pinata! Ahu! We love pinatas!

The lower picture is from my favorite part of the book. When I first read it, I just felt so encouraged. Finally there was someone out who'd talk excatly about the things I think about future-wise. Travelling alone and articles related to independent businesses and part-time working ... I was in wonderland!  The chapter is called 'Moving & shaking' and it'll give you all the tools you need to move&shake it as an independent lady! Makes me excited to move out and pursue my goals and dreams!
Lastly - tell me how cute is this? There are lots of cute little doodles all over the book which along with the other photos make it really fun and visual.

Hope I could infect you a bit with the BUST bug - 'cause being a BUST-girl is cooool!
Lots of Love, Tabea

June 27, 2013

PATIENCE OH PATIENCE...

Hello there! Today I want to talk to you guys about a topics that's been on my mind for quite some time now... Patience. 

My mom always tells me to never say 'I'm so impatient' at a job interview when they ask me about my weaknesses. Well I won't but ... I AM impatient at times. We all are, I think. It's probably sort of a thing for this generation to be impatient. Did you know that on average people my age get nervous or angry when a web pages takes more than 11 seconds to load? How crazy is that? 

I told you about the thunderstorm that had struck into our internet aerial (talk to me if you have any problems finding the right terms for any electrical devises - I'm a pro.). Our Wifi had broken down for a few days and I had to use my mobile internet ... which is sorta slow. Well while I wasn't finding it too hard to wait for a page to load for a few seconds, some of my friends actually went kinda crazy about it. Some even switched phone with other friends whose internet hadn't been slowed down by the phone company yet... 

Got me thinking... what are we waiting for so eagerly when we surf the web with limited speed? Why are we getting mad at our phones (and yepp I caught myself doing that) when we're just waiting for our Facebook feed to load? I've talked about the whole phone issue before here, but I just found it weird that something we think is so indispensable in our life actually brings out such bad traits and makes us unhappy, you know?

There's another issue though that's been on my mind connected to this. How much patience do we need to have with people? Is there a magic limit of how many chances you can give a person before it's time to leave? And is it possible to change a person or is trying this just a waste of time? Questions over questions. Sorry friends I don't have an answer and but wanted to throw this out there... Does anyone have the ultimate answer?
Personally I'm not very patient with people unless we're really close which isn't that often. But taken the case it is, I tend to hold on to people for a long time. Obviously I get mad, I want to leave, I know that I derserve better. But for some reason I always pick myself up and stay with the person. Does anyone feel the same as I do?
Okay ... as long as we are waiting for our relationship coach / most patience experienced person: Here's the first photo of my face ever in a blogpost. I love this blue dress from Topshop! I wore it to a Jazz concert given by the Blue Lake Jazz ensemble from Michigan, USA. The little girl on the right was super duper cute and I think her face (even from the side you can see her impressed stare) says what we all thought of this concert. It was beautiful. And I think it's really admirable how much patience these young musicians put into playing their instruments! Had to make that connection haha!

 Lots of Love, Tabea ♥

June 25, 2013

FABRIC COVERED PHOTO ALBUM

She's back! Woohoo! The reason why I was gone is rather simple - a lightning bold struck into one of the local aerials which is responsible for our internet. I've never seen lighting that bright and I guess neither did the aerial. So we were cut off the world wide web for a few days - thank god for mobile internet, but a blog post just wasn't possible to upload! 

Well today I'm back and ready to share the progress i made with my photo album. 

So this is how my embroidery project turned out - I love it! The colors are nice and bright and really scream: Summer's here! Looking at the back part of it you can see that I didn't suture the left-over thread. I'm not entirely sure whether this is the best way to do it, but I wanted to avoid any bumps the knots might have caused.

Now we're coming to the main part: How to cover an album with fabric...

You start by mixing equal parts of glue and water and spread that mixture over the front or back of the photo album. Try to get especially the borders and corner and don't use to much of it - you don't want to get your fabric all soaked, do you?

The next step was nicer to show on the middle part where the binding is. You've already put the glue in place and now you'll just flap the fabric over and gently smoothen it out with your hand. Do this until the entire outer part of the album is covered with fabric and watch out for any creases close to the binding part. Glide over them with your fingers so the fabric really sticks to the book in all places - otherwise you'll get ugly air bubbles underneath it.
Okay good job so far! Now we're coming to the tricky part. You cut off all four corners of your fabric so it'll be easier to fold later. You also make a straight cut where the round binding part starts. 
Self-explanatory, isn't it? Haha this photo just screamed for handwriting! It's simple. Put glue onto the edges of the book and fold the fabric over. You might have to fight a bit with the corners depending on how much fabric you have to fold over. My advise: Put glue on those bad boys until they stay in place! You are the boss here!

Lastly...
Covering the binding... This might get a bit violent. I'm kidding! It's all good and easy! Two steps: 1) Put glue onto the fabric flap 2) Bend the book boards to the back and the whole between the cover and the binding thingy wil expand. Now push the fabric flap in there! See the scissors I placed so nicely in the background? I USED THEM FOR THIS! Don't know why I sream when I say this but yeah .. I'll advice you to use anything long and flat like a ruler.

Well I hope you enjoyed this little tutorial - I'm really sorry I don't have more pictures of the album itself ... the light and I were just not having it today.
To make you curious (muhaha!) - here's another picture of me working on the last decorative part of the album. So hope to see you again for more DIY album action!

By the way did you spot my creative way of spelling summer? SUMMME. I'm a pro, I know...

Lots of Love, Tabea ♥